11 Simple UV Mapping
By far our materials are pretty boring due to the simple color pattern. In this chapter we’re going to introduce the uv coordinate and now, our texture can vary accoring to the uv. You can also implement things like albedo map, and even normal map now.
11.1 Theory
The basic idea of uv-coordinate is that the surfaces of common objects are 2d, and thus could be mapped to a 2d space. The usually used 2d space is \([0, 1]^2\). When we calculate a point on the surface of an object, we can also calculate the uv-coordinate of that point. And with uv-coordinate, we can map any 2d data to the surface of objects.
We need to define the uv coordinate for every primitive type we have already defined.
For sphere, it’s easy. The spherical coordinate uses three parameters, radius \(r\), vertical angle \(\theta\) and horizontal angle \(\phi\). Since radius is always same for all points on a sphere, we can thus uses this two angles as the base of our uv coordinate. The relation between point represented in spherical coordinate and common 3d coordinate is:
\[ \begin{aligned} p_x &= r \sin \theta \sin \phi \\ p_y &= r \sin \theta \cos \phi \\ p_z &= r \cos \theta \end{aligned} \]
Solve this gives us \(\theta = \arccos \frac{p_z}{r}\) and \(\phi = \arctan \frac{p_y}{p_x}\). The range of \(\theta\) is \([0,\pi]\), and range of \(\phi\) is \([-\pi, \pi]\). By normalizing them to \([0,1]\), we can use \(\theta\) as \(u\) and \(\phi\) as v, and thus we have the uv-coordinate of points on a sphere.
The uv-coordinate for a quadrilateral is even simplier - remember the \(a\) and \(b\) we used to determine whether a point is in that quadrilateral? Both of them evaluates within \([0, 1]\), and they can be used as \(u\) and \(v\) directly!
The uv-coordinate for a cube is a bit cumbersome. You can indeed use a way that assigns a unique uv to each point, as we’ve done for quadrilaterals and spheres. However, I want to use an easier way, that is to caculate the uv on the side the point lying on. So we’re repeating the same pattern on each side. Given that each side of a cube is a quadrilateral, or more precisely, a rectangle, we can use the same way to calculate the uv.
It’s also possible to map using the point directly. In this case, the texture is call 3d texture.
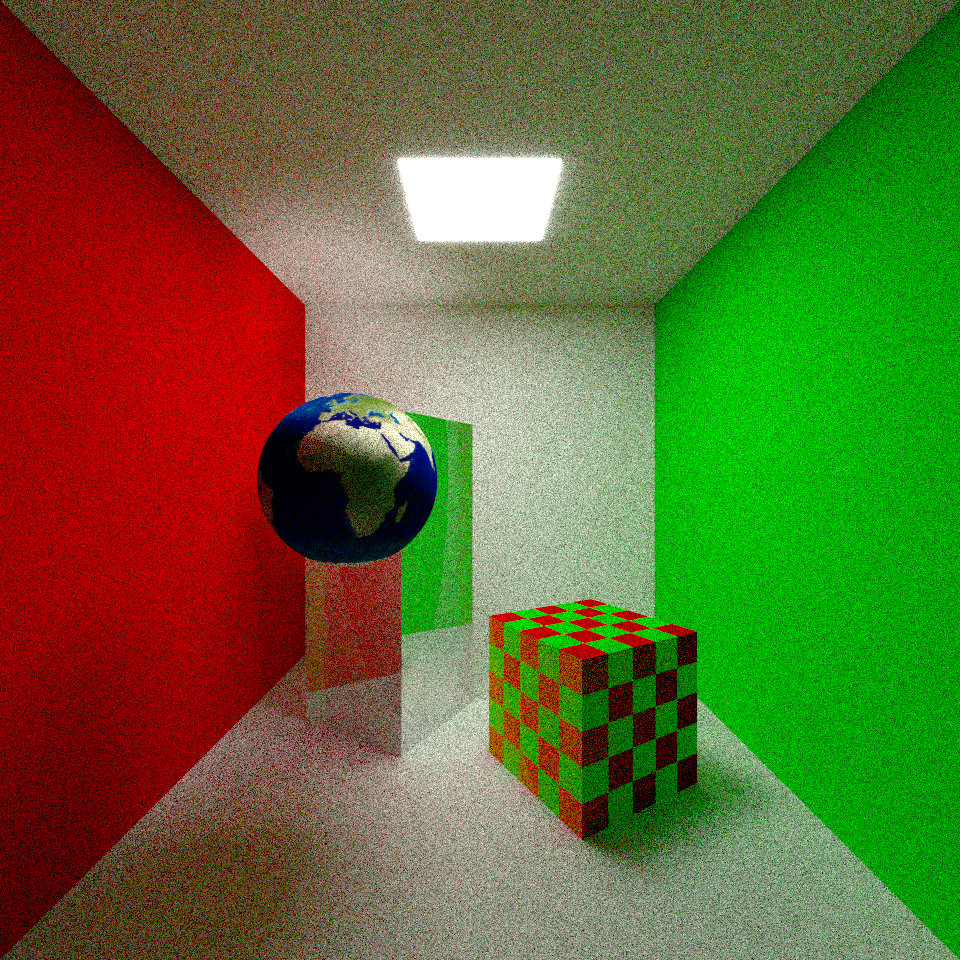
11.1.1 Checkerboard3D
We will first present a simple 3d trexture so you have some basic idea about texture mapping.
Consider what’s a checkerboard? It’s simply two interleaving different textures. The core idea of checkerboard is just how to split the usable space into two parts, that making the two textures interleaved with each other.
We use cubes for each unit of a space that is used in the checkerboard. Consider a 1d case. Given a line, we can split it using a step, or size \(d\), that each segment takes 1 unit. Those segments are colored with different textures interchangingly. For a point \(p\) on that line (just a scalar value as it’s on a line), we can determine the color by the oddness of \(\left \lfloor p / d \right \rfloor\). And the 3d space is just a natural extension of the 1d case, where we use the oddness of the sum of \(\left \lfloor p / d \right \rfloor\) on each axis. Alternatively, we can add an initial number to \(p\) so we can adjust the pattern more precisely.
11.1.2 Checkerboard2D
This is also an extension of 1d case above, except that we do this in the uv-coordinate instead of world space.
11.1.3 Albedo Map
An albedo maps a point to a color on an image, and in our case, we just transform the uv-coordinate to the coordinate of the image, and uses the nearest color around that point. Advanced topics like anti-aliasing will be discussed later.
11.2 Design
To support uv-based texture, we need to ask the primitives to calculate the uv-coordinate when doing intersection test. We should also modify the data structure to store uv information. And finally we add the uv to the parameter of texture’s evaluation method so it can use uv coordinate.
The three kinds of textures listed above is then easy to implement without further requirement to our code.
11.3 Implementation
First add uv everywhere you’ll need it or you need to provide it, for type definition and function signatures. Most of the remaining code are also easy to fill in since they need only passing the uv coordinate from one variable to anther, or from one funciton to another. The only problematic places are the ray object intersection test, wchih we’ve discussed before.
impl Shape for Sphere {
    fn hit(&self, ray: Ray, rt_max: f32) -> Option<SurfaceHit> {
        // ...

        let normal = hit_position.normalize();
        let u = (normal.z.acos() / f32::PI()).clamp(0.0, 1.0);
        let v = (normal.y.atan2(normal.x) / f32::PI() / 2.0 + 0.5).clamp(0.0, 1.0);

        // ...
    }

    // ...
}
Note here we’re using the normal instead of the hit point, so the radius \(r\) is always \(1.0\). The uv coordinate is according to the side it lies on, so we modify the AABB::normal_at method to new AABB::normal_uv_at method.
impl AABB {
    // ...

    pub fn normal_uv_at(&self, point: Vec3) -> (Vec3, (f32, f32)) {
        let d = self.diagonal();
        if relative_eq!(point.x, self.min.x) {
            (
                Vec3::new(-1.0, 0.0, 0.0),
                ((point.y - self.min.y) / d.y, (point.z - self.min.z) / d.z),
            )
        } else if relative_eq!(point.x, self.max.x) {
            (
                Vec3::new(1.0, 0.0, 0.0),
                ((point.y - self.min.y) / d.y, (point.z - self.min.z) / d.z),
            )
        } else if relative_eq!(point.y, self.min.y) {
            (
                Vec3::new(0.0, -1.0, 0.0),
                ((point.x - self.min.x) / d.x, (point.z - self.min.z) / d.z),
            )
        } else if relative_eq!(point.y, self.max.y) {
            (
                Vec3::new(0.0, 1.0, 0.0),
                ((point.x - self.min.x) / d.x, (point.z - self.min.z) / d.z),
            )
        } else if relative_eq!(point.z, self.min.z) {
            (
                Vec3::new(0.0, 0.0, -1.0),
                ((point.x - self.min.x) / d.x, (point.y - self.min.y) / d.y),
            )
        } else {
            (
                Vec3::new(0.0, 0.0, 1.0),
                ((point.x - self.min.x) / d.x, (point.y - self.min.y) / d.y),
            )
        }
    }
}
Now lets add the three new textures.
#[derive(Debug, Clone)]
pub struct Checkerboard3D {
    pub mat1: Arc<Texture>,
    pub mat2: Arc<Texture>,
    pub offset: Vec3,
    pub size: Vec3,
}
Checkerboard2D is almost the same as Checkerboard3D except that the offset and size are Vec2.
impl SurfaceColor for Checkerboard3D {
    fn value(&self, p: Vec3, uv: (f32, f32)) -> Color {
        let Vec3 { x, y, z } = (p + self.offset) / self.size;
        let index = (x.floor() + y.floor() + z.floor()) as i32;
        if index % 2 == 0 {
            self.mat1.value(p, uv)
        } else {
            self.mat2.value(p, uv)
        }
    }
}
This implementation is also easy to understand. For Checkerboard2D, replace p with uv, and the idea is same.
To implement the albedo map, we need to load an image from a given path, and this might fails, so we have to handle errors.
#[derive(Debug, Clone)]
pub struct AlbedoMap {
    pub albedo: Arc<TextureImage>,
}

impl AlbedoMap {
    pub fn new(albedo: Arc<TextureImage>) -> Self {
        Self { albedo }
    }

    pub fn load<P: AsRef<Path>>(path: P) -> Result<Self, TextureLoadError> {
        let image = TextureImage::load(path)?;
        Ok(Self::new(Arc::new(image)))
    }
}
The TextureMap is just another alias of RgbImage. I do this so we can distinguish the two usages.
#[derive(Error, Debug)]
pub enum TextureLoadError {
    #[error("Failed to load image")]
    Io(#[from] io::Error),
    #[error("Failed to transform image to RGB format")]
    Transform(#[from] image::ImageError),
}

impl TextureImageExt for TextureImage {
    fn load<P: AsRef<Path>>(path: P) -> Result<Self, TextureLoadError> {
        let image = image::io::Reader::open(path)?.decode()?.into_rgb8();
        Ok(image)
    }

    fn get_by_uv(&self, (u, v): (f32, f32)) -> Color {
        let p = self.get_pixel(
            (v * (self.width() - 1) as f32).floor() as u32,
            (u * (self.height() - 1) as f32).floor() as u32,
        );
        Color::new(
            p.0[0] as f32 / 255.0,
            p.0[1] as f32 / 255.0,
            p.0[2] as f32 / 255.0,
        )
    }
}
I used thiserror to define the error type, so we can use the ? opeartor to handle errors easily. The get_by_uv method is defined here to query a color according to the given uv, and here we’re using the nearest pixel to the given uv. Now we can try them in our scene and our scene can be more interesting.